Making of Aspect Star N: Coding for the NES
This fall, I released my first NES game, Aspect Star “N”. Though not my first foray into programming for 8-bit systems, it was my first project to actually get completed. In this blog post, I want to talk a bit about how I adapted Aspect Star to the NES, and some of the choices I made along the way. Maybe it’ll inspire some of you to try it yourself!
Aspect Star
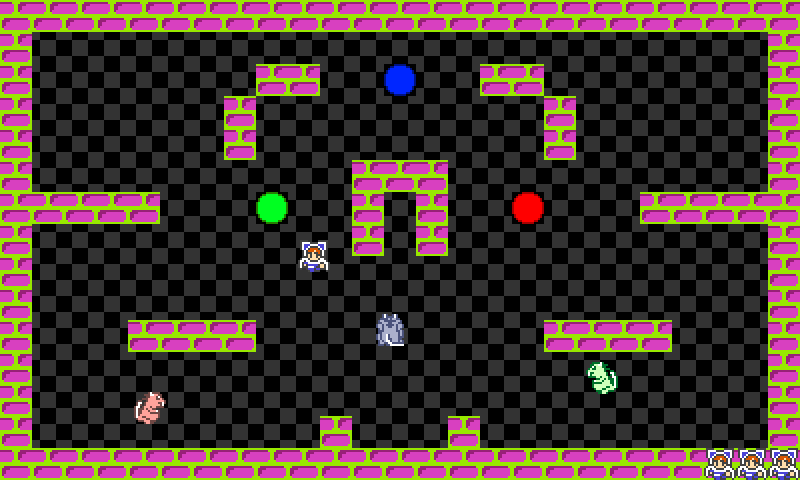
Aspect Star (GitHub link) is a small game I made in 2015 using C# and Monogame. The gameplay takes place over a series of levels, each being a single non-scrolling board. The goal is to kill all of the enemies; touching an enemy will kill you.
The “Aspect” gameplay element is that all enemies have a color– blue, green, or red. You also have a color, and you can only shoot bullets of that color. Enemies can only be killed by a bullet whose color matches them. Therefore, you need to make use of the tiles on the level that change your color to match the enemy. Enemies who walk on them will also change colors.

Aspect Star is a short and simple game; there are nine levels, and the screenshot above shows all of the tile graphics. Therefore, I’ve often used it as an experiment game to port to other platforms. For example, Aspect Star W (GitHub link, actual game) is a simple port of the first level to HTML5/JS. It’s slow, clunky, and despite all that its code nevertheless formed the basis of quite a few of my JS games from then on.
Porting Aspect Star to the NES
So, having chosen my game, I decided to make some decisions. First of all, I wanted to improve on Aspect Star at the same time. Specifically,the game is not colorblind-friendly due to the color palettes chosen; in later games in the series, I added a set of symbols to go alongside the colors. In fact, Aspect Star III: Aspect Legend imitates a Game Boy game, and so has no colors at all!
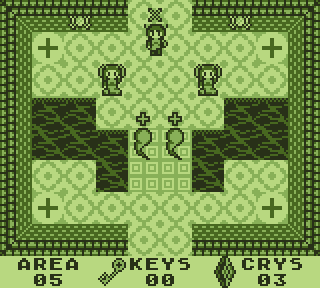
I also decided I wanted to keep the project completable by a single person in a reasonable amount of time, and therefore small-scale. Just like the original Aspect Star, I wouldn’t have more than nine levels, I wouldn’t implement scrolling levels (so they’d be limited to the much smaller NES resolution), and I also wouldn’t have a mapper. Let me go into some more detail on that.
NROM
The Famicom/NES uses an interesting system architecture where there is no graphics RAM; instead, the system expects to see an 8K graphics ROM on the cartridge. Similarly (and this part is normal for cartridge-based systems), there is a 32K ROM that contains the code for the game. In fact, all the code the system has access to– unlike 8-bit computers from the period, the Famicom has no built-in ROM. Compare this to the Apple ][, where developers frequently use the built-in ROM and you can see the challenge. (I’ll be comparing to the Apple ][ a lot, since it’s what I learned before the NES)
But remember, a cartridge isn’t like a floppy disk that just holds data in a preset pattern; it’s a full-fledged circuit board, and can have all sorts of hardware on board. A “mapper” is such a configuration (it could be a single chip, or a few discrete chips); you can, for example, have multiple graphics ROMs and switch between them, or even put RAM on the cartridge where the system expects ROM.
By limiting myself to “NROM” or “mapper 0”, it means that I don’t get to take advantage of any of these special chips. It puts a strict limit on the size of the code and the size of the graphics (which for me turned out to be the limiting factor). But remember, I wanted something I could finish. At the time I started this project I was (and still am) embroiled in the very elaborate Javascript game Aspect Star 4, and wanted something simpler.
Tools of the trade: Emulators
The FCEUX emulator was the obvious choice. I have a background in ROM hacking, so I’m familiar with many options, but FCE Ultra and its successors have been what I’ve been used to ever since I stopped using DOS-based emulators. (Alas, poor FWNES, I knew thee). FCEUX features a debugger, a RAM viewer, and a PPU (the NES’ graphics card) viewer, which are all invaluable. (Unlike the Apple ][, the NES has no built-in monitor. You shouldn’t be surprised by that. It’s a game console.)
Though FCEUX is a performant emulator with convenient debugging features, it’s not known for perfect accuracy. Accuracy in emulation is its own topic, but I figured the best way to sidestep this was to use real hardware. I used a RetroUSB PowerPak to run my compiled ROMs on the actual hardware. There are other flash options for the NES; this just happens to be the one I’ve had for quite awhile, and it’s held up pretty well so far.
Oops!
This is one of the first mistakes I made, in retrospect. Here’s the surprising fact: an accurate emulator can be better than a flash cartridge. Why? Bootup state. The PPU is a tricky bugger to initialize, and you need to make sure to clear its memory (the “nametables”) properly on startup. But if you’re running from a flash cart, it’s already cleared the memory for you. It had to in order to load its menu.
Thankfully, this didn’t cause any bugs, but it was something I only noticed through reviewing code– there were indeed places where I might’ve otherwise only noticed after burning the ROM onto a cartridge. So therefore, it’s probably worth doing the occasional run in more accurate emulators like Nintendulator when doing development.
Assemblers and assembly
For assembly language, I’ve already gotten used to the ca65 assembler, which is part of the cc65 series of tools. This also includes a C compiler; personally, I wouldn’t bother using C on such a limited system. ca65 is a macro assembler, and thanks to its C connection it has a nice import/export symbol feature that I used to keep things in multiple files.
While an assembly language tutorial is outside of the scope of this article, what I will say is that there is no reason for you to be intimidated by 6502 assembly (the particular dialect used on the NES). Unlike modern processors with a whole host of registers and caches to worry about, the 6502 has no cache, and three registers, which all have defined purposes and only one is really “general-purpose”. There’s a lot less to keep track of.
Reasoning about 6502 code is not hard, it’s just tedious. Compared to the Apple ][, the 2A03 CPU of the NES is missing decimal mode (which you probably weren’t going to use, unless you’re the developer of Pachi-Com), and since your code lives on a ROM, you can’t do self-modifying code. Self-modifying code is a neat trick, but it’s harder to reason about. These two limitations are practically the NES making things easier for you!
Starting the project
One thing that I found about the NES relative to the Apple ][ is that while the Apple ][ has a ton of 70s and 80s sources (many easily available on archive.org), the NES has far more modern resources. The NES homebrew scene is huge, and you should feel free to dig into sites like NESDev and grab the fruits of their labor.
Similarly, I started the project using this sample project by Brad Smith. It initializes the PPU, sets up an NMI loop, displays some graphics on the nametables, and moves some objects around. That’s everything we need! Let’s talk about those elements.
Initializes the what?
The PPU stands for Picture Processing Unit, and is the heart of the NES. Sure, the 2A03 is the CPU, but it’s similar to other 6502-based systems like the Apple ][, Commodore 64 (which it runs faster than) and the Atari 8-bit line. The PPU gives the NES its graphical limitations, its palettes, and everything else you see.
The PPU is very different than the graphics chips of the systems I mentioned before. Those computers shared the graphics memory with the same memory the CPU has. This has the advantage that it’s very easy for the CPU to access screen memory, but it means that you have to avoid any conflict. Drawing a TV signal requires tight timing, and on the Commodores and the Atari 8-bit computers, the graphics chip can turn off the CPU to make sure it has memory access. (The Apple ][, as befitting Steve Wozniak, has a clever hack)
The PPU, on the other hand, has its own memory that the CPU can’t access directly. Instead, it just exposes a few special addresses (called registers) where the CPU can send it commands. This is slower, but it means that the NES CPU can always run at its blistering 1.79 MHz. (I don’t know what PAL is)
And what kind of loop is that?
The PPU spends most of its time reading its memory to draw on-screen. Remember, drawing a TV signal requires accurate timing. Therefore, the only time that it’s really safe to put things in the PPU memory is called vblank, the vertical blanking interval. This is the time between each frame the PPU draws.
To let the CPU know vblank has started, it triggers an interrupt. NMI is just the name of the specific interrupt (NMI just stands for Non-Maskable Interrupt) triggered, and it is triggered 60 times each second. An interrupt causes the CPU to drop the code that it’s running, and run an interrupt routine. That interrupt routine is found at a special address in the ROM, so we can set it to whatever we’d like.
Get those graphics off my table!
This is where the single-screen game design comes into play. See, the PPU has just two screens worth of RAM. These are called the nametables. The 8KB character ROM I mentioned above is divided into 8x8 tiles, and the tiles in the first 4KB can be used here. You can only modify the nametables during vblank, or when the PPU is turned off (but you would only want to turn it off during initialization, as it turns the screen black). There are various rules about palettes here too.
A scrolling game like Super Mario Bros. each vblank needs to constantly update the nametables, update the scrolling registers, etc. Aspect Star “N” doesn’t need to do any of that; the nametables contain the map that we set up at the beginning of the level, it doesn’t scroll, and everything that moves is an object.
Object-ion! Get it? GET IT?
Finally, objects are just what the NES calls its hardware sprites. These are either 8x8 or 8x16 (Aspect Star “N” uses both sizes! But the game itself uses 8x8), use the second 4KB of the character ROM (8x16 sprites can use the full ROM), and have their own memory. Nominally, there is “object attribute memory” on the PPU that you could modify. In practice, you can set up a transfer between the CPU memory into the PPU memory each NMI (called “DMA”, for Direct Memory Access). What does all that mean? You can use a chunk of CPU memory as if it was the sprite memory, and it’ll get updated each frame. It’s a fair sacrifice of RAM in my book.
Pretty much everything that moves in Aspect Star “N” is a sprite. For example, let’s take Nicole.
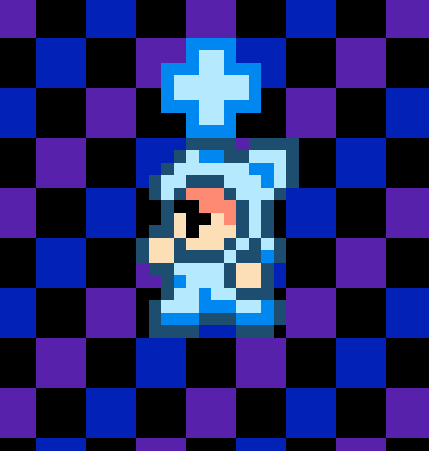
Nicole is made up of a luxurious seven sprites. The “+” aspect marker above her head is one sprite. Her body is made up of 4 8x8 sprites. Each of the sprites can have one 4-color palette; in order to get the additional colors for her face, I use two more sprites.
The NES can have 64 sprites on screen at one time. The enemies don’t have faces, so they need only five sprites. I decided that I probably didn’t need more than eight enemies on screen at any given time, so our sprite budget in game mode is 47, plus one more for the player’s bullet. This isn’t bad; but look at our Aspect Star screenshot at the top of the article. See those bottom right Nicoles? They symbolize the lives counter.
With 47 sprites, that leaves only 17 sprites; not even enough for three lives, let alone a maximum of nine. That’s why Aspect Star starts each level with a fadein directly into the level, and Aspect Star “N” starts each level with a pre-level screen showing your life count.
Turning it into a game
Sprite walking around on screen
Taking the above-linked example code, I expanded it out into something that would draw a level, then added a routine to draw Nicole, and then grabbed some Gamepad-reading code from NESdev. This is the all-important first step: moving around on screen.
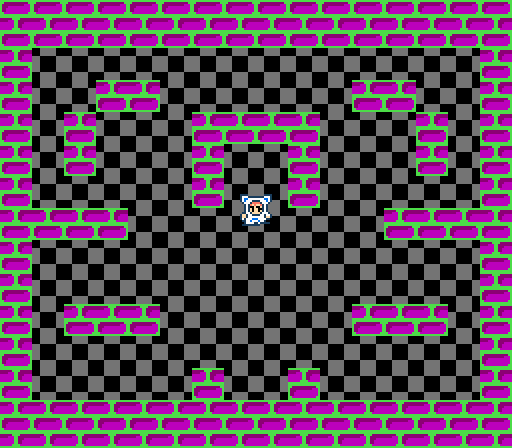
From then, everything is iteration. The example code has a variable called nmi_count. This increments each NMI (sixty times each second, remember), and we can use this to have animations. We can also adapt the graphics, and add collision detections and aspects. Aspects are just a special case of collision detection.
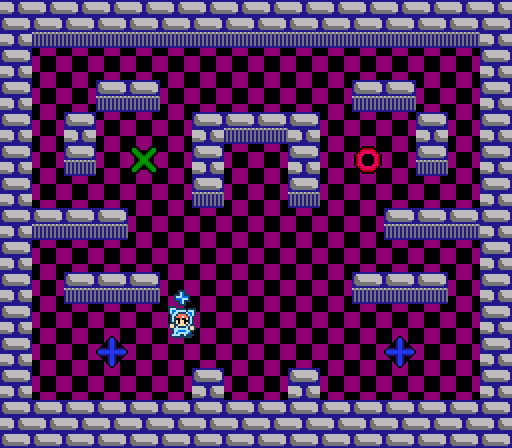
More sprites, same screen
Next I decided to try to tackle enemies. The enemy code is much cleaner than the Nicole-drawing code, because I realized that I’d want multiple enemies, and therefore made things more generic.
First off, though, I just made a very simple code that adds three enemies to the level, and then moves them closer in the direction of Nicole. Let’s give it a try.
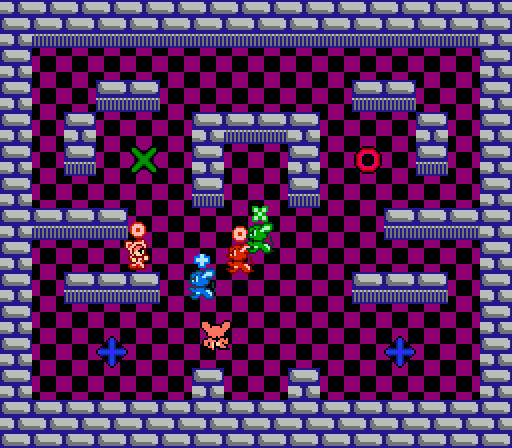
Even though I added only four enemies, I had left room for eight in RAM. I decided to make the uninitialized enemies have a Y position of 255 (hexadecimal: 0xFF, the highest 8-bit number). This isn’t a valid position of the NES’ screen, so it’s easy to check for.
So, having just said it was easy to check, I… forgot to check. Therefore, that fourth enemy is actually five enemies, made up of the uninitialized RAM walking towards me. Terrifying!
In general, code errors are way more fun on the NES than in Javascript, because in assembly, your code will keep on running, no matter what stupid thing you tell it to do. For example, if you tell it to go to level 2, but there is no level 2:
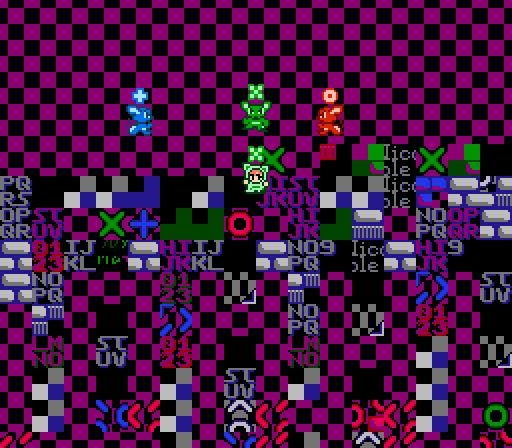
It’s starting to look like a game!
With the enemies in place, and some better AI (though enemy-enemy collision would remain a thorn in my side throughout development, and isn’t perfect even in the final), then it starts to really feel like a game.
Throughout the process, I try to keep the game small. A good example is that when you die, your character becomes the only one on screen. Why is that? Because the enemy code is more flexible than the player drawing code; therefore, I overwrite the first two enemy slots with the player’s face and body. This might seem like laziness. It is. It also results in the game getting finished!
More screens
The title screen comes into existence around this time.
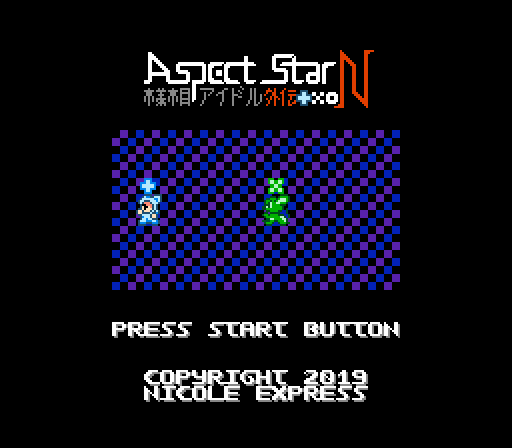
Dying is a mode of the game. This is also a mode of the game, the same as dying. The character sprite and the enemy chasing her are both drawn by the same code that draw them in the game. Even the happy train in the Nicole Express logo is drawn by the enemy code! Code reuse is really powerful here. Since “draw” and “update” code is separate, here I can use the same draw code, and have simpler update code that doesn’t need to care about things like the gamepad or AI.
For music and sound effects, I grab the FamiTone audio library. Music really goes a long way in making a game feel like a game. A lot of the music are pieces I’d already written for unreleased games, though I had to rewrite them in FamiTracker. One track from Aspect Legend even made it in! (This one, specifically)
I realized at this point that I would have some more space in the ROMs, so I decided to add dialogue screens. These would be pretty simple, with just a face and text, but I like adding a story to games. Aspect Star lacked this element, so now I could go back and rectify it.
The Character ROM and the dialogue screens
The biggest limiting factor in the game was the character ROM. To give each set of three levels its own feel, I gave them their own palette, and didn’t use the same tiles in different levels, even though there’s no technical reason I couldn’t.
Here’s the first 4KB, the “nametable” graphics:
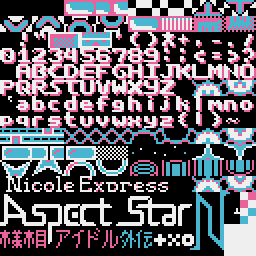
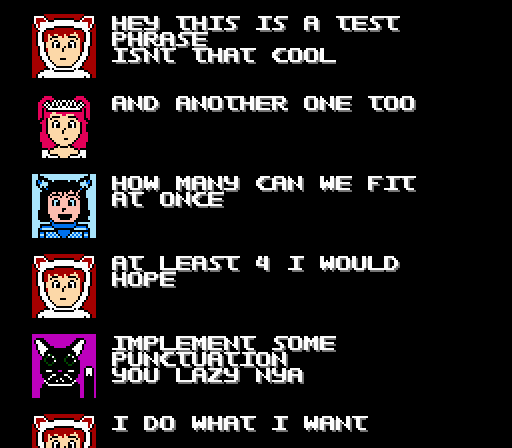
As you can see, the font is a killer. The tiles are laid out so that the font tile numbers match the ASCII codes for each letters; this made it easy to use with ca65, which has built-in handling of null-terminated strings. Initially, I only wanted to use an uppercase font. That didn’t look very good:
Some space was wasted here for code brevity. For example, you’ll notice the first four 8x8 tiles are blank. This is repetitive, but was done to simplify the map drawing code. The map is made out of 16x16 tiles, and therefore it just takes four in a row. Therefore, only one address needs to be stored. This is true even for a tile that’s entirely blank.
Since the font lives in background memory, I did have to add some special handling in the dialogue code for NMI, to add one letter each frame until the current string is complete.
And now, the objects
![]()
Object memory is simpler, and has a little more unused space. Aspect Star “N”, like Aspect Star has only three enemy types: mice, birds, and dogs. Enemies are more manually laid out in memory, but this is mostly used for things like the death animation, which is as noted above, technically an enemy.
The faces in dialogue screens are implemented using sprites. Specifically, two rows of four 8x16 sprites are used to form a 32x32 base, and then two more on top for different facial expressions. (It’s fine to intermix 8x8 and 8x16 sprites in the same game, but at any given time you can only have one type on screen, as they use the same memory) Zip doesn’t have facial expressions, but you could add one if you wanted. It’d just draw a face on top of her.
This has an interesting implication! In dialogue code, there will never be more than one face on any row. But if you don’t mind the spoiler, take a look at this tweet that gives away the ending. Why are the characters laid out like that?
There can only eight sprites per “scanline” (a fancy term for a horizontal row). The rest won’t be drawn, or can be flickered. (Flicker is implemented for enemies only– and yes, flicker is something that you need to implement!) But each non-Zip face puts six sprites on its center rows. Therefore, the faces are staggered slightly to avoid the need for flicker.
This could also be solved by putting Zip in the center. But I thought it was funnier to put Zip off by herself.
Wrapping it up
This is just a small snapshot of my thought process during the development of Aspect Star “N”. I had a lot of fun making it! And to note, the game can be freely downloaded at my itch.io page. Development took about three months; fast, because I deliberately set an achievable goal.
Will I make another NES game? Initially I wasn’t planning on it, but since there was a lot of good feedback of this one, so perhaps I’ll give it another shot! And I’ll be tempted to add a lot more to it this time… so we’ll see if that one gets finished.
I’m planning on doing a follow-up on this about actually making the physical cartridges. So look forward to that if you’d like!
